
Configuration avancée
par
popularité : 10%

Configuring the Installation<A
name=configuringtheinstallation>
Les images qui vont
suivre sont en GUI mais lors de l’installation classique cela sera en TUI.
 |
 |
If you see the following message :
Settings from a previous installation session were found at
startup.  Do you wish to retain these settings for the
current session?
Respond Respond |
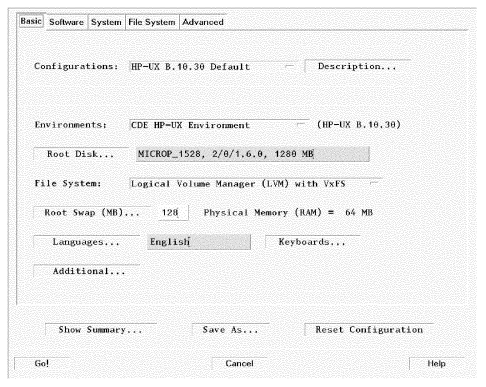
This screen shows all the basic information for setting up the file system and for loading the Operating System (OS) environment. It also allows you to configure languages, locale, and keyboard requirements. A Save As... button also appears, for saving configurations for later use.
ConfigurationsSelect the operating system
environment from the choices available in the list. For HP-UX 11.0, this may
include 64-bit or 32-bit byte format. The choices and defaults depend on the
releases available on the server, and may include, for example, Common Desktop
Environment (CDE) as the default.
File System
Clicking on Go ! initiates an installation. Since the Go ! button
is always available, it may be selected from any of the tabs. If you don’t need
to do any customization, select Go ! now to begin the installation.
After clicking on Go !, you will still have the opportunity to cancel
out of the install sequence.
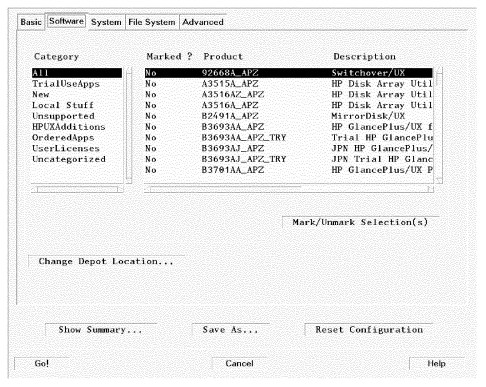 |
This tab allows you to choose licensing level and additional applications
that you configured when you set up your server. To access a specific depot, you
can also change depot locations.
|
This display does not dynamically update from a newly-selected depot. When choosing a new depot, it must be identical in content to the current one. If it is not, you can use the make_config tool on the server to configure the new depot. |
- Category : Select on a topical category to display the list of products available for that category.
<IMG height=5 src="/hpux/hp/installation/pixel.gif" width=1> - Product List : Double-click on a product in the list to select (highlight) it and to toggle its "marked" status ("Yes" or "No"). You can also use the Mark/Unmark Selection(s) button to toggle the "marked" status for a selected item.
The System Tab<A
name=timezonesetting><A
name=daysetting>You can choose not to set any
system parameters for the system during this installation. During the first boot
of the target system, a parameters screen will collect this information.
You will see a choice selection allowing you to set parameters now, or at
first boot of the target system. If you choose to set these parameters now, you
will see the following :
Select this button to
bring up a set of tabs which will enable you to enter information on the
following :
- Static Routes
<IMG height=5 src="/hpux/hp/installation/pixel.gif" width=1> - DNS
- NIS
- XNTP
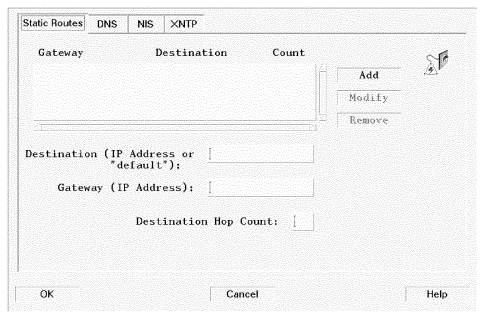 |
If your network is
divided into subnets, you will probably need to specify a gateway system to
reach other subnets :
- Destination : The field has the word "default" or the IP address of the destination network.
<IMG height=5 src="/hpux/hp/installation/pixel.gif" width=1> - Gateway : The IP address of the device connecting your network to the remote network, or your own IP, if wildcard routing is used.<A name=hopcountconfiguring>
<IMG height=5 src="/hpux/hp/installation/pixel.gif" width=1> - Hop Count If your gateway IP is not your system’s own IP, this is usually set to "
1". If your gateway IP is the same as your system’s, then the Hop Count is "0".
For more information, see the routing (7) man page.
On this screen, you can configure the
Domain Name (an extension to the host name, such as fc.hp.com) and
the IP address of the Domain Name Server. The listing of current Servers is
displayed, if they are predefined in the Ignite-UX server.
The IP address of the Domain Name Server is given in a form such as
15.13.115.168. Use the command nslookup on a running
system to find this information.
- Select Add, after you have added a DNS server. Use Modify if you are changing an existing entry.
<A
name=configurationforinstallfilesystem><A
name=parametersfilesystem><A
name=filesystemparameterssetting>
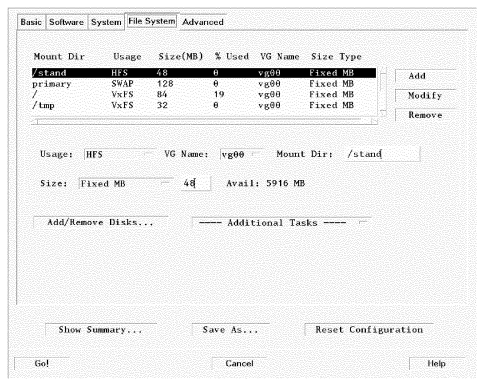 |
This tab enables you to do a variety of file-system and disk-configuration
tasks and will differ in appearance, depending on whether you previously
selected LVM or whole disk, on the Basic tab. This illustration is what you
would see if you had picked LVM on the Basic tab.
<A
name=addingandchangingfilesystemconfiguration>Adding and Changing File System
Configuration
<IMG height=5
src="/hpux/hp/installation/pixel.gif" width=1>
To add or change any configurations on the display of file systems,
- Enter the information in an appropriate field below the display
- Select one of the buttons to the right
- To see more information on the file system display, use the horizontal scroll bar or resize the screen.
- The "Available" indication shows how much space is unallocated in the volume group of the highlighted volume.
For LVM :
- One of the logical volumes must be root (
/). <BR clear=left>
- A swap volume is required.
<IMG height=5 src="/hpux/hp/installation/pixel.gif" width=1> - Directory names must have valid HP-UX names (e.g.,
/usr,/database, etc.).
The buttons which activate changes are :
- Add
- Modify
- Remove
Generally, changes are not put into effect until you select one of these. If
you make a change and then leave the tab without using one of these buttons,
your changes may not be applied.
 |
Transfer Lists
![]() width=1>
width=1>
In this screen you can activate any HP or custom scripts which you might want
to run as part of your installation. Note that the scripts listed are those with
a "scripts" keyword in the INDEX file.
The file /var/opt/ignite/config.local is a place holder for such
files as you may want to generate for post-install, for example.
For more details, see the instl_adm (4) man page.
Adding a Script
![]() width=1>
width=1>
To add an item to "Scripts to be Executed" :
- Select the item from "Scripts Available" to select it.
- Select Add to add it to the list "Scripts to be Executed."
Removing a Script
![]() width=1>
width=1>
To remove an item from "Scripts to be Executed :"
- Select the item in "Scripts to be Executed".
- Select Remove to remove it.
The item will be deactivated, but will continue to be available in the
"Scripts Available" list.